
In today’s fast-paced world, having a scanner at your fingertips can be incredibly useful. Whether you need to digitize important documents, share receipts with your accountant, or create digital copies of your favorite photos, a scanner app can simplify your life. But what if you don’t have access to a traditional scanner? The solution is simple: your smartphone. This article will guide you through the process of turning your smartphone into a powerful and portable scanner, allowing you to scan documents and images with ease and efficiency. Learn how to scan directly from your smartphone’s camera and explore the benefits of various scanner apps.
Scanning documents and images with your smartphone is more convenient and cost-effective than ever before. Discover the numerous advantages of using your smartphone as a scanner, from its portability and ease of use to its potential for integrating with cloud storage services. This comprehensive guide will explain the steps involved in using your smartphone camera as a scanner, recommending the best scanner apps available for both Android and iOS devices. We will also delve into essential tips and techniques for achieving optimal scan quality, ensuring crisp, clear, and professional-looking results every time you scan.
Install a Scanner App
To use your smartphone as a scanner, you’ll first need to install a dedicated scanner app. Many excellent options are available on both the Apple App Store and the Google Play Store. Choosing the right app depends on your specific scanning needs and preferences.
Some popular and highly-rated choices include Adobe Scan, Microsoft Lens, and Google Drive (which includes a built-in scanning feature). These apps offer a range of features, from basic document scanning to advanced options like optical character recognition (OCR), cloud storage integration, and PDF editing.
When selecting an app, consider factors such as:
- Ease of use: The app should have a clear and intuitive interface.
- Features: Determine which features are essential for your needs, such as OCR or cloud integration.
- Image quality: Look for apps that produce clear, high-resolution scans.
- Price: While many apps are free, some offer premium features through in-app purchases or subscriptions.
Once you’ve chosen an app, download and install it on your smartphone, just like any other app. You’ll then be ready to start scanning documents and images.
Use Notes App on iPhone
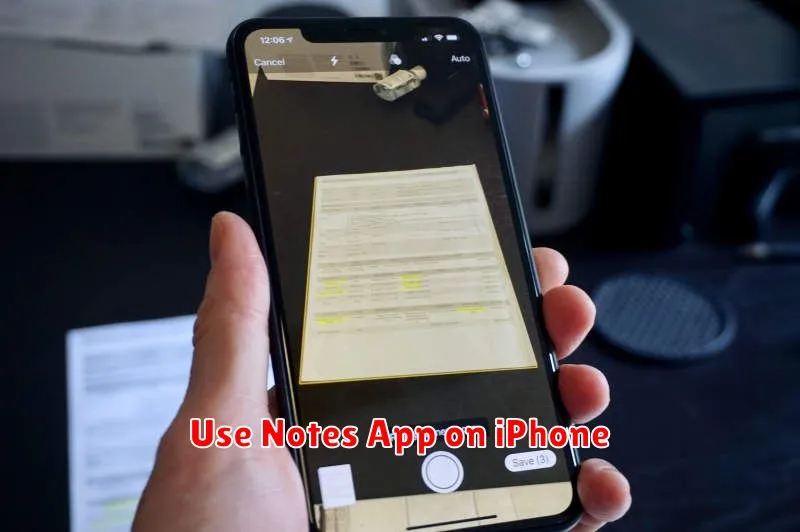
The built-in Notes app on your iPhone offers a convenient scanning feature. This method is particularly useful for quickly digitizing documents without needing a third-party app.
To begin, open the Notes app and create a new note. Tap the camera icon located above the keyboard. Select “Scan Documents” from the menu that appears.
Position your document within the camera frame. The app will automatically detect and capture the document. Manually capture the scan by pressing the shutter button if the automatic capture doesn’t work. Adjust the corners of the scan as needed for accuracy.
After you’re satisfied with the scan, tap “Save” or “Keep Scan”. You can then save the scan as a PDF or within the note itself. This digitized document is now readily accessible and shareable from your Notes app.
Scan with Google Drive
Google Drive offers a convenient built-in scanning feature, readily accessible on both Android and iOS devices. This functionality allows you to create high-quality digital copies of your documents directly within the Drive app.
To begin scanning, open the Google Drive app on your smartphone. Locate and tap the ‘+’ button typically found in the bottom right corner. From the menu that appears, select ‘Scan’.
Your device’s camera will activate, ready to capture your document. Position the document within the frame and ensure it is clearly visible. The app will automatically detect the edges of the document and capture the image. Adjust the cropping as needed, and tap the checkmark icon to save the scan.
After capturing the image, you have options to enhance the scan further. You can rotate, crop, and adjust the color settings (e.g., black & white, color). Once you are satisfied with the scan, tap ‘Save’. The scanned document will be saved as a PDF within your Google Drive.
Enhance and Crop Documents
After capturing the document, most scanning apps offer tools to enhance its quality and crop unnecessary areas. Enhancing typically involves options to adjust brightness, contrast, and sharpness. These adjustments can significantly improve the readability of the scanned document, especially if the original lighting conditions were suboptimal.
Cropping is crucial for removing unwanted background or borders. Precise cropping ensures the final scanned document contains only the essential information. This is particularly useful for receipts, business cards, or articles where the surrounding area is irrelevant.
Most apps provide intuitive cropping tools. You can usually drag the corners of a selection box to define the area to be kept. Some apps also offer automated cropping, which attempts to detect the document’s edges and crop accordingly. After enhancing and cropping, review the document to ensure it meets your requirements before saving or sharing.
Save and Share Files Securely
After scanning a document, ensuring its security and proper sharing is crucial. Secure saving prevents unauthorized access and data loss. Secure sharing protects your information during transmission.
Consider these options for saving:
- Cloud storage services: These offer convenient access and backup but require internet connectivity.
- Device storage: Saving directly to your smartphone offers offline access but presents risks if the device is lost or compromised.
- Secure folders/apps: These provide an additional layer of security on your device through password protection or encryption.
For sharing, prioritize secure methods:
- Password-protected files: Add a password before sharing to restrict access to authorized individuals.
- Encrypted messaging apps: Utilize apps that offer end-to-end encryption for enhanced security during transmission.
Always choose methods that align with the sensitivity of the document. For highly confidential information, stronger security measures are necessary.