
In today’s digital age, privacy has become a paramount concern for smartphone users. Android, being the world’s most popular mobile operating system, offers a wide array of privacy settings that empower users to control their personal data. This article will guide you through the top privacy settings you should enable on your Android device to bolster your digital security and protect your sensitive information. Understanding and utilizing these settings is crucial for safeguarding yourself from potential privacy breaches and ensuring a more secure mobile experience.
From managing app permissions and location access to securing your lock screen and controlling data sharing with third-party apps, Android provides granular control over your privacy. This guide will highlight the most impactful privacy settings you should immediately enable on your Android phone. By taking a proactive approach to your privacy and utilizing these settings effectively, you can significantly mitigate privacy risks and maintain a higher level of control over your personal information on your Android device.
Disable Location Tracking
Location tracking, while convenient for some apps, can be a significant privacy concern. Disabling location tracking entirely or for specific apps helps protect your movements from being constantly monitored.
To disable location services completely:
- Open the Settings app.
- Navigate to Location.
- Toggle the Use location switch to the off position.
For more granular control, you can manage location access for individual apps:
- Open the Settings app.
- Go to Apps.
- Select the specific app.
- Tap on Permissions.
- Choose Location and select the desired permission level (Allow all the time, Allow only while using the app, Ask every time, or Don’t allow).
Limit App Permissions
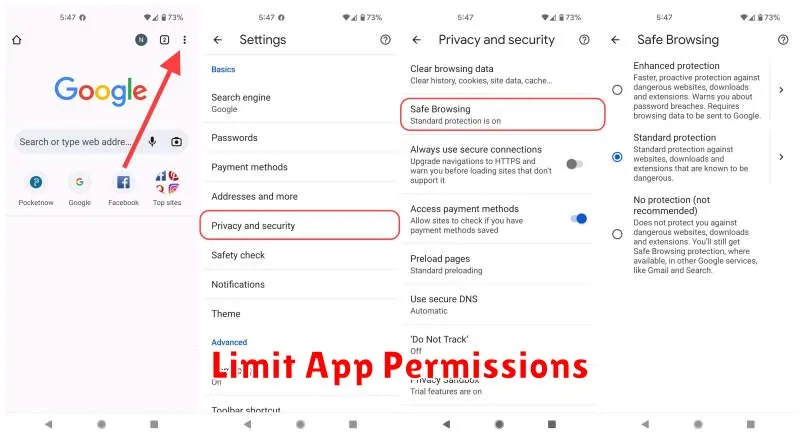
One of the most effective ways to enhance your Android privacy is by managing app permissions. Apps often request access to various features and data on your device, some of which may not be necessary for their core functionality. By limiting these permissions, you can significantly reduce the potential for data leakage or misuse.
To manage app permissions, navigate to the App Permissions section within your device’s Settings. Here, you’ll find a categorized list of permissions, such as location, camera, microphone, contacts, and storage. Review each category and assess which apps have access. Revoke permissions for apps that you believe don’t require that specific access.
Pay close attention to permissions related to location, camera, and microphone, as these can be particularly sensitive. Consider whether an app truly needs constant access to your location or if granting access only when the app is in use is sufficient. Regularly auditing your app permissions is a key practice for maintaining your privacy on Android.
Use Private DNS
Private DNS provides a more secure and private way to resolve domain names by encrypting your DNS queries. This prevents third parties from intercepting and monitoring your browsing activity. By default, your DNS queries are handled by your network provider, which means they can see every website you visit.
Enabling Private DNS on your Android device gives you more control over your DNS traffic. You can choose to use your network provider’s DNS or specify a different DNS provider, such as Google Public DNS or Cloudflare DNS. Using a trusted third-party DNS provider can offer enhanced security and privacy benefits.
To enable Private DNS, navigate to your device’s Network & internet settings. Look for the Private DNS option, often located within the “Advanced” settings. Here, you can choose between “Off,” “Automatic,” and “Private DNS provider hostname.” Selecting “Automatic” will typically use your network provider’s encrypted DNS if available. If you choose “Private DNS provider hostname,” you’ll need to enter the hostname of your preferred DNS provider, such as dns.google for Google Public DNS.
Review Activity Controls
Activity Controls manage the data Google saves about your interactions with its services. This information personalizes your experience, offering tailored recommendations and more efficient searches. However, you can adjust these controls to balance personalization with privacy.
Web & App Activity is a core setting. Enabling it allows Google to store your search history, website visits, and app usage data. Disabling it limits personalization but enhances privacy. Consider your priorities when adjusting this important setting.
Location History tracks your physical locations over time. This data powers features like timeline and location-based recommendations. Disabling it prevents Google from storing this information, but some location-based services may be affected.
Other notable activity controls include YouTube History, which tracks videos you watch and search for, and Device Information, which collects data from your Android devices. Review each control individually to determine your preferred settings.
Enable Screen Lock and Encryption
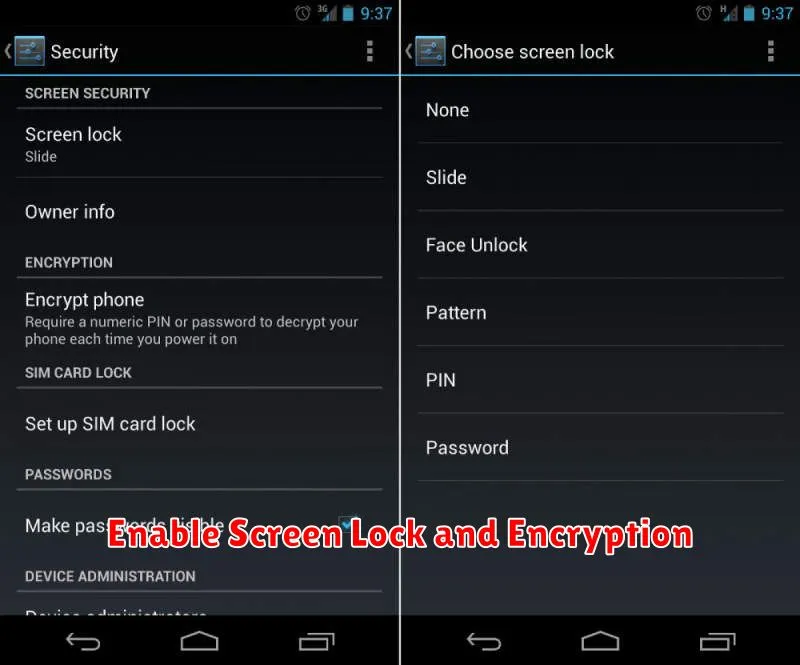
A screen lock is the first line of defense against unauthorized access to your device. Android offers various lock screen options, from simple patterns and PINs to more secure methods like passwords and biometric authentication (fingerprint, face recognition). Choosing a strong screen lock is crucial.
Encryption takes device security a step further. It scrambles your data, making it unreadable without the decryption key (which is tied to your screen lock). This protects your information even if your device is lost or stolen. Most modern Android devices come with encryption enabled by default, but it’s important to verify this in your security settings.
To enable or change your screen lock, and to check your encryption status, typically navigate to Settings > Security > Screen lock or a similar path depending on your Android version and device manufacturer.